最近整理了下团队新人文档,对团队内使用的框架 riot.js 这部分内容做了一些总结。本文主要在 riot.js 源码 方面,分析一下 riot.js 的执行原理和使用优化。
Riot.js 简介
Simple and elegant component-based UI library (Riot.js)
riot.js 是一个简单优雅的 js UI框架。具有自定义标签,简单语法,API简单,体积小, 学习成本低等特点。riot.js 使用Model-View-Presenter (MVP)设计模式来组织代码, 这样它能够更模块化、更具可测试性且易于理解。riot.js 仅仅提供了帮助UI渲染相关的基础功能 ,并不具备其它复杂的功能,因此其体积很小,压缩后仅有 10.39KB (react.min.js 大约 47.6KB ), 很适合组件类的业务开发。
Hello world
尝试 Riot.js 最简单的方法是使用 JSFiddle Hello Riot.js 例子。你可以在浏览器中打开它。 或者你也可以创建一个 .html 文件,然后通过如下方式引入Riot.js:
<script src="https://cdn.jsdelivr.net/npm/riot@3.7/riot+compiler.min.js"></scipt> 自定义标签
Riot.js 采用自定义标签的语法,每个自定义标签都可以看做是一个组件(Riot.js Tag 对象),自定义标签将相关的 HTML 和 JavaScript 粘合在一起,成为一个可重用的组件。可以认为它同时具有 React 和 Polymer 的优点,但是语法更友好,学习成本更小。
<riot-demo>
    <span>{ title }</span>
    <script>
        this.title = "Hello World";
    </script>
</riot-demo>
在团队中,我们会使用 webpack 来构建 riot 项目。每个组件都被写成一个 *.tag 文件。
Riot.js 基本执行原理
一个riot自定义标签在日常开发中从源码到呈现在页面上主要分为三步:编译(一般利用官方自带编译工具)、注册(riot.tag())和加载(riot.mount()),如下图所示: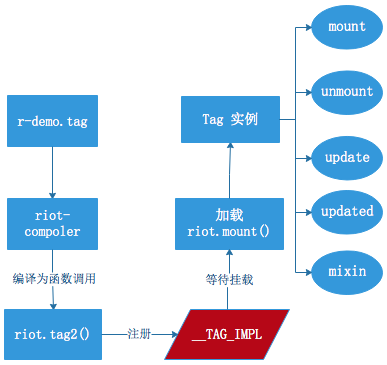
编译
编译阶段的主要工作就是将riot语法写的.tag文件转换为可执行的.js文件,这部分主要靠编译器来完成。例如:
riot.tag2('content-demo', '<h1>{message}</h1>', '', function (opts) {
	this.message = 'hello world';
});
riot.tag2 函数在 riot.js 源码中的 core.js 文件中,代码如下:
export function tag2(name, tmpl, css, attrs, fn) {
    if (css) styleManager.add(css, name)
    // tags implementation cache 标签接口缓存
    __TAG_IMPL[name] = {
        name,
        tmpl,
        attrs,
        fn
    }
    return name
}
参数含义如下:
- name: riot 自定义标签的名称
- tmpl: 标签的html内容
- css:
标签中的内容 - attrs: riot 自定义标签的属性
- fn: 用户自定义函数,即
标签中的内容
riot.tag2() 函数将 riot tag 注册到了 __TAG_IMP 对象中,方便之后的使用,css部分则被添加到了 byName 变量中,用于之后统一添加到页面中。在源代码中,还有一个 riot.tag()函数,这个函数用于直接直接创建一个 riot tag 实例的接口,而 riot.tag2() 是暴露给编辑器的接口,本质上功能是一样的。
加载 riot.mount()
组件被注册好以后,并没有被渲染,直到我们调用 riot.mount() 函数后,相应的组件才会渲染到页面上。源码如下:
export function mount(selector, tagName, opts) {
    const tags = []
    let elem, allTags
    // root {HTMLElement} riot-tag 标签节点
    function pushTagsTo(root) {
        if (root.tagName) {
            let riotTag = getAttr(root, IS_DIRECTIVE),    // 要么 data-is 要么 root.tagName 本身
                tag
            // ① 设置 data-is 属性指向
            if (tagName && riotTag !== tagName) {
                riotTag = tagName
                setAttr(root, IS_DIRECTIVE, tagName)
            }
            // ② mountTo 创建一个新的 riot tag 实例
            tag = mountTo(root, riotTag || root.tagName.toLowerCase(), opts)
            if (tag)
                tags.push(tag)
        } else if (root.length)
            each(root, pushTagsTo)
    }
    // DOM 注入 style 标签
    styleManager.inject()
    if (isObject(tagName)) {
        opts = tagName
        tagName = 0
    }
    if (isString(selector)) {
        selector = selector === '*' ?
            allTags = selectTags() :
            selector + selectTags(selector.split(/, */))
        // ③ 利用 $$ 来判断 这些 tag 是否已经挂载在 html 上面
        elem = selector ? $$(selector) : []
    } else
        elem = selector
    // 将所有元素挂载在根元素中
    if (tagName === '*') {
        tagName = allTags || selectTags()
        if (elem.tagName)
            // 查找elem下的 tagName
            elem = $$(tagName, elem)
        else {
            // 将查找到的所有节点都 放入 nodeList中
            var nodeList = []
            each(elem, _el => nodeList.push($$(tagName, _el)))
            elem = nodeList
        }
        tagName = 0
    }
    pushTagsTo(elem)
    return tags
}
当调用 riot.mount 后,通过 selector 参数来查找 html 页面上对应的节点。不在 html 上的节点是不会被渲染的。③处代码为查找过程,其中$$为 document.querySelectAll。之后调用 pushTagsTo 函数来渲染 riot tag。IS_DIRECTIVE = 'data-is' 渲染前,要检查是否含有 tagName 参数,如果有的话即为 上述 riot.mount 的第三个用法。此时需要检测 root 的 data-is 属性值是否和 tagName 相等,如①处。不相等则将 root 设置其 data-is 为 tagName。
取消注册 riot.unregister()
riot.unregister() 源码十分简单,如下:
export function unregister(name) {
    __TAG_IMPL[name] = null
}
Riot.js 组件
在 Riot.js 中,每个自定义标签都可以看成是一个组件,每个组件其实本质上都是一个 Tag 对象, 里面包含了对象的各种属性和方法
Tag 类
Tag 类简化源代码如下:
// impl 包含组件的模板,逻辑等属性
export default function Tag(impl = {}, conf = {}, innerHTML) {
    ...各种属性初始化
    defineProperty(this, '__', {...})
    defineProperty(this, '_riot_id', ++__uid)
    defineProperty(this, 'refs', {})
    ...
    // 定义组件更新方法
    defineProperty(this, 'update', function tagUpdate(data){...}.bind(this))
    // 定义组件 mixin 方法
    defineProperty(this, 'update', function tagMixin(data){...}.bind(this))
    // 定义组件加载方法
    defineProperty(this, 'mount', function tagMount(data){...}.bind(this))
    // 定义组件卸载方法
    defineProperty(this, 'mount', function tagUnmount(data){...}.bind(this))
}
组件的生命周期
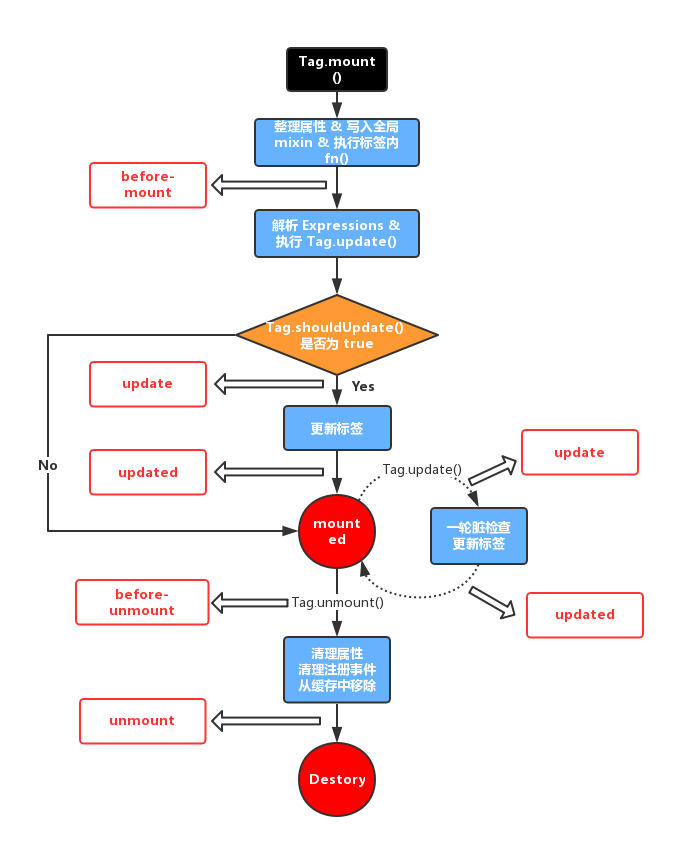
riot 组件状态分为以下几个部分:
- before-mount:标签被加载之前
- mount:标签实例被加载到页面上以后
- update:允许在更新之前重新计算上下文数据
- updated:标签模板更新后
- before-unmount:标签实例被卸载之前
- unmount:标签实例被从页面上卸载后
riot.js 采用事件驱动的方式来进行通讯,我们可以采用如下函数来监听上面的事件,例如处理 update 事件:
<riot-demo>
    <script>
        this.on('update', function() {
            // 标签更新后的处理
        })
    </script>
</riot-demo>
再谈组件加载
当我们调用 riot.mount() 渲染指定组件的时候,riot 会从 __TAG_IMPL 中获取相对应的已经注册好的模板内容,并生成相应的 Tag 实例对象。并且触发其上的 Tag.mount() 函数,最后将 Tag 对象缓存到 __TAGS_CACHE 中。代码如下:
export function mountTo(root, tagName, opts, ctx) {
    var impl = __TAG_IMPL[tagName],   // 获取 html 模板
        implClass = __TAG_IMPL[tagName].class, // ?
        tag = ctx || (implClass ? Object.create(implClass.prototype) : {}),
        innerHTML = root._innerHTML = root._innerHTML || root.innerHTML
    var conf = extend({
        root: root,
        opts: opts
    }, {
        parent: opts ? opts.parent : null
    })
    if (impl && root) Tag.apply(tag, [impl, conf, innerHTML]);
    if (tag && tag.mount) {
        tag.mount(true)
        // add this tag to the virtualDom variable
        if (!contains(__TAGS_CACHE, tag)) __TAGS_CACHE.push(tag)
    }
    return tag
}
组件加载阶段,首先会整理标签上所有的 attribute 的内容,区分普通属性,和带有表达式 expr 的属性。
defineProperty(this, 'mount', function tagMount() {
    ...
    parseAttributes.apply(parent, [root, root.attributes, (attr, expr) => {
        // 检测 expr 是否在 RefExpr 的原型链中
        if (!isAnonymous && RefExpr.isPrototypeOf(expr)) expr.tag = this;
        // 挂载在 root.attributs 上面 root 为组件所在的 dom 对象
        attr.expr = expr
        instAttrs.push(attr)
    }])
    // impl 对象包含组件上的各种属性,包括模板,逻辑等内容
    implAttrs = []
    walkAttrs(impl.attrs, (k, v) => {
        implAttrs.push({
            name: k,
            value: v
        })
    })
    // 检查的是 implAttrs
    parseAttributes.apply(this, [root, implAttrs, (attr, expr) => {
        if (expr) expressions.push(expr)   //插入表达式
        else setAttr(root, attr.name, attr.value)
    }])
    ...
}).bind(this)
初始化这些表达式内容,然后为组件添加全局注册的mixin 内容。接下来,会执行我们为组件添加的函数内容,此时触发 before-mount 事件。触发完毕后,解析标签上的表达式,比如 if each 等内容,然后执行组件的 update() 函数。
在 update() 函数中,首先会检查用户是否定义了组件的 shouldUpdate() 函数,如果有定义则传入两个参数,第一个是想要更新的内容(即调用this.update() 时传入的参数)。第二个为接收的父组件更新的 opts 内容。若该函数返回值为 true 则更新渲染,否则放弃。 (这里需要注意,Tag.mount() 阶段由于组件尚未处于记载完毕状态,因此不会触发 shouldUpdate() 函数)。
defineProperty(this, 'update', function tagUpdate(data) {
    ...
    // shouldUpdate 返回值检测
    if (canTrigger && this.isMounted && isFunction(this.shouldUpdate) && !this.shouldUpdate(data, nextOpts)) {
        return this
    }
    ...
    // 扩展opts
    extend(opts, nextOpts)
    if (canTrigger) this.trigger('update', data)
    update.call(this, expressions)
    if (canTrigger) this.trigger('updated')
    return this
}).bind(this);
之后会触发 update 事件,开始渲染新的组件。渲染完毕后触发 updated 事件。
加载完毕后,修改组件状态 defineProperty(this, 'isMounted', true)。如果渲染的组件不是作为子组件的话,我们就触发自身的 mount 事件。否则的话,需要等到父组件加载完毕后,或者更新完毕后(已经加载过了),再触发。
defineProperty(this, 'mount', function tagMount() {
    ...
    defineProperty(this, 'root', root)
    defineProperty(this, 'isMounted', true)
    if (skipAnonymous) return
    // 如果不是子组件则触发
    if (!this.parent) {
        this.trigger('mount')
    }
    // 否则需要等待父组件的状态渲染状态
    else {
        const p = getImmediateCustomParentTag(this.parent)
        p.one(!p.isMounted ? 'mount' : 'updated', () => {
            this.trigger('mount')
        })
    }
    return this
}).bind(this)
当我们调用 tag.unmount 卸载组件的时候,首先会触发 before-unmount 事件。再接下来清除所有的属性和事件监听等内容后,触发 ‘unmount’ 事件。
组件更新原理
在 riot.js 中,想要更新组件我们必须手动调用 tag.update() 方法才可以或者通过绑定 dom 事件触发(通过模板绑定的事件,会在回调执行完毕后自动触发 tag.update ),并不能做到实时的更新处理。例如:
<riot-demo>
    <h1>{ title }</h1>
    <button click={ handleClick }>修改内容</button>
    <script>
        this.title = "标题"
        handleClick() {
            this.title = "新标题";
            this.update();   // 调用 update 方法才能重新渲染组件
        }
    </script>
</riot-demo>
riot.js 并没有提供 virtual dom 的功能,而是实现了一个粗粒度的 virtual dom。riot.js 为每个组件创建的 tag 对象中都保存一个 expressions 数组,更新的时候遍历 expressions 数组,对比旧值,如果有变化就更新DOM。这种更新机制类似angular的脏检查,但是仅有一轮检查(单项数据流)。更新处理依照模板类型来处理:
- 文本内容的,直接: dom.nodeValue = value
- 值为空,而且关联的 DOM 属性是 checked/selected 等这种没有属性值的,移除对应的属性
- 值为函数的,则进行事件绑定
- 属性名为 if,则做条件判断处理
- 做了 show/hide 的语法糖处理
export function toggleVisibility(dom, show) {
    dom.style.display = show ? '' : 'none'
    dom['hidden'] = show ? false : true
}- 普通属性的,直接设置其值
riot.js 和 react 一样也有 props(静态,riot 中为 opts) 和本身数据(动态),具有和 react 一样的输入。但是输出的时候,由于没有 virtual dom UI的更新并没有集中处理,是分散的。
riot.js 采用的这种方式,代码量上大大的减少,但是也带来了比较严重的性能问题。
更新性能问题
首先我们来看一段 vue 代码:
<div id="demo">
    <ul>
        <li v-for="item in items">
            {{ item.name }} --- {{ item.age }}
        </li>
    </ul>
    <button v-on:click="handleClick">更新列表项</button>
</div>
var demo = new Vue({
el: '#demo',
data: {
items: [
{ name: 'tgy', age: 23},
]
},
methods: {
handleClick: function() {
this.items = [
{ name: 'tgy', age: 23},
{ name: 'hy', age: 22},
]
}
},
mounted: function() {
console.log("组件挂载完毕");
document.querySelector("li").extraType = "origin";
},
updated: function() {
console.log("组件更新完毕");
console.log(document.querySelector("li").extraType);
}
}) 代码很简单,单击按钮,为列表添加一条新数据。在组件挂载完毕后,为第一个 li 的 property 上面添加了 extraType 属性。列表更新后,再去访问这个 li 的 extraType 属性。运行结果如下:
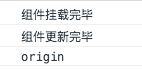
不出意料,可以正常访问到 li 的type属性。这说明了,在更新过程中,第一个 li 节点仅仅是 textContent 发生了改变而不是重新创建的。这样的结果得益于 virtual dom 算法,保证更新最小变动。同样的我们用 riot 来重写上面的代码。
<content-demo>
<ul>
<li each={ items }>{ name } -- { age }</li>
</ul>
<button class="btn" click={ handleClick }>订阅内容</button>
<script>
let self = this;
this.items = [
{"name": "tgy", age: 23}
];
handleClick() {
this.items = [
{"name": "tgy", age: 23},
{"name": "hy", age: 22}
]
}
this.on('mount', function() {
console.log("组件加载完毕");
document.querySelector("li").extraType = "origin";
})
this.on('updated', function() {
console.log("组件更新完毕");
console.log(document.querySelector("li").extraType);
})
</script>
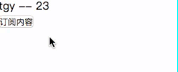
</content-demo>查看运行结果:
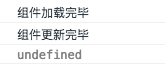
extraType 找不到了,所有的 li 节点都被重新构建了。这里面发生了什么,查看源码 /tag/each.js。渲染逻辑代码如下:
export default function _each(dom, parent, expr) {
    ...
    expr.update = function updateEach() {
        ...
        each(items, function (item, i) {
            // 仅仅记录 items 是对象的
            var
                doReorder = mustReorder && typeof item === T_OBJECT && !hasKeys,
                // 旧数据
                oldPos = oldItems.indexOf(item),
                // 是新的
                isNew = oldPos === -1,
                pos = !isNew && doReorder ? oldPos : i,
                tag = tags[pos],
                // 必须追加
                mustAppend = i >= oldItems.length,
                // 必须创建 isNew
                mustCreate = doReorder && isNew || !doReorder && !tag
                // 有key值得时候需要 mkitem
            item = !hasKeys && expr.key ? mkitem(expr, item, i) : item
            // 必须创建一个新 tag
            if (mustCreate) {
                tag = new Tag(impl, {
                    parent,
                    isLoop,
                    isAnonymous,
                    tagName,
                    root: dom.cloneNode(isAnonymous),
                    item,
                    index: i,
                }, dom.innerHTML)

                // mount the tag
                tag.mount()
                if (mustAppend)
                    append.apply(tag, [frag || root, isVirtual])
                else
                    insert.apply(tag, [root, tags[i], isVirtual])

                if (!mustAppend) oldItems.splice(i, 0, item)
                tags.splice(i, 0, tag)
                if (child) arrayishAdd(parent.tags, tagName, tag, true)
            } else if (pos !== i && doReorder) {
                // move
                // 移动
                if (contains(items, oldItems[pos])) {
                    move.apply(tag, [root, tags[i], isVirtual])
                    // move the old tag instance
                    tags.splice(i, 0, tags.splice(pos, 1)[0])
                    // move the old item
                    oldItems.splice(i, 0, oldItems.splice(pos, 1)[0])
                }
                if (expr.pos) tag[expr.pos] = i
                if (!child && tag.tags) moveNestedTags.call(tag, i)
            }
            // 缓存原始数据到节点上
            tag.__.item = item
            tag.__.index = i
            tag.__.parent = parent;
            // 如果不是创建的,我们需要更新节点内容。
            if (!mustCreate) tag.update(item)
        })
        // remove the redundant tags
        // 删除多余的标签
        unmountRedundant(items, tags)
        // 记录旧的数据
        // clone the items array
        oldItems = items.slice()
        // dom 插入节点
        root.insertBefore(frag, placeholder)
    }
}
这段为列表渲染逻辑,遍历新的数据items中的每一下 item。在原始数据 oldItems 中去查找(oldItems.indexOf(itemId)),是否存在 item 项。如果不存在,则标记 isNews 为 true。之后走到 if 的 mustCreaete 为 true 的分支,去创建一个新的 tag(将 li 节点看成是一个tag)。以此类推,当全部创建完毕后,删除旧的节点(unmountRedundant(items, tags))。在断点下,可以清楚看到节点的变化情况:
优化更新
综上所述,riot.js 的更新逻辑仅仅是判断新旧数据项是否为同一对象。为此,为了减少 DOM 的变动,降低渲染逻辑。我们修改handleClick函数:
handleClick() {
    this.items.push({"name": "hy", age: 22})
}
这样输出结果就会和 vue 的保持一致,并没有创建新的 tag,而是利用了已经存在的内容。源码中,这种情况下 isNews 为 false,从而避开了 创建标签。而仅仅是通过 tags.splice(i, 0, tags.splice(pos, 1)[0]); 来移动位置,if (!mustCreate) { tag.update(item); } 更新节点内容。
保证数据项对象地址不变,仅仅是修改上面的不可变对象的值,将大大的提高 riot.js 的渲染效率。
// 更新第一个li内容

// 不推荐写法,对象发生变化;
this.items[0] = {"name": "hy", age: 23};

// 推荐写法,仅仅是修改对象中的值
this.items[0].name = "hy";
this.items[0].age = 22;
保证源数据对象的不变,仅仅改变其上面的值,这样就能减少 riot.js 渲染过程中,创建新的 tag 对象的开销。